Pages

Tuesday, 20 June 2017

Tonic shaker card for my little niece.

My little niece has just had a beautiful Wendy house built for her by my very clever sister!!

I found some little wooden ladybirds in my craft stash that she could stick onto her little house, or onto the plant pots as she has helped her mummy plant flowers all around her Wendy house in the garden.

I didn't just want to send the ladybirds down in an envelope so I decided to create a card using cream and craft card with the Tonic Heart die and shaker set 1657e.  I also used two of the Tonic Essentials stamp sets, 'Reach For The Stars 1658e' and  'It's Party Time 1654e'.


I used my Stamp Platform to stamp the bunny in the basket from 'Reach from the stars' stamp set with the Nuvo Hybrid Black Shadow ink pad and coloured the bunny in from the with my Nuvo Aqua Flows. I water coloured in the bunny with the Soft Rose 911n and the basket I coloured with Lilac Blossom 909n and then I used Indigo Dawn 903n for shadows in an around the sides of the hot air balloon basket.  Behind the bunny, I wanted a few clouds to make it look like the hot air balloon was floating in the sky so I used 'Reach from the stars' stamp set again but this time I used Nuvo Hybrid metro grey ink.


Once the clouds were in place I die cut the heart where I wanted the hot air balloon to be, my strings from the basket weren't long enough so I used a black pen to extend them towards the heart.


I then  worked out where I wanted the 'Heart die cut' to be on the base card as I wanted my niece to have access to the ladybirds (without ripping the card to get to them) so I used an idea from a lovely crafty friend Bibiana Cameron who made a card for the launch of the Tonic shaker cards using tin foil inside the card. Bibiana used sweets in her Shaker card so the recipient could easily access the sweets. I just thought this was ingenious so I sealed all of the ladybirds inside the heart bubble with the tin foil.


I glued the cream card onto the craft card base making sure the heart die cuts lined up.  It was tricky doing it but well worth it, it looked fab (I forgot to take a photo of the inside of the card) I am still a beginner blogger!! :(


I die cut a cloud out of the cream card then used the heart die to cut into the cloud so the cloud would cuddle the heart... ( as seen in the photo above)   I popped the cloud up onto sticky foam to give the card more depth.

I finished off with a sentiment  'Just because' from the 'It's Party Time' stamp set. I glued another cream piece of card to the centre of the card for me to write my message to my gorgeous little niece.

My niece loved her card,  that is all that matters to me.  :):):)


Crafty Hugs

Cal :)


Wednesday, 31 May 2017

Tonic 40th Birthday card for a good friend.

Hi I made a card for a good friend of mine for the weekend.  I don't know about you but I find making male cards very difficult, so I brought out my tonic goodies and I came up with this:-


I used all Tonic products on this card, except for the card which was from Stampin up,  I used both Smokey Grey and Basic Grey.

If you look in the background at my MacBook,  I am watching Hochanda,  Jodie Johnson was on with Tonic products :) :)

The Mirri card was just from my stash.
I started with a square card base 8x8  and layered up the card with the Smokey Grey and Basic grey card stock with the Mirri.

My next layer was a piece of Smokey Grey and I have a stamp from Tonic Sentimental Strips- It's Your Special Day 1365e.... it's a gorgeous stamp!!  I used my Tonic Tim Holtz stamp platform to stamp the back ground using my VersaMark ink, I used the strip to fill the whole piece of card. I then sprinkled Tonic Nuvo Clear Embossing Powder 603N. I heat set the embossing powder with a heat gun.

I then used Tonic Deco Trellis Base Die set 505e, and cut the die out of Basic Grey, I thought it looked lovely with the Mirri card behind it shining through.


I used Tonic Advent Drawer Deco die set 562E for the numbers '40' and the letters were Tonic 'Windsors' Upper Case 1688e and Tonic 'Windsor' lowercase1687e for the 'Th'.  


I layered up the '40Th' and did a drop shadow with both Smokey Slate and the Basic Grey and put the Mirri on the top to make it stand out.  I propped the Middle of the Deco Trellis die up on foam pads, to raise it up off the card as in the photo above..

In the middle of the card it seemed very plain so I used the  Mirri card and the Smokey Grey then used a white card for the 'Happy Birthday' Tonic 'Everyday Sentiments' die set 1 600E.


I just love this sentiment!!

Well thats me for today, thank you for popping by.

Crafty hugs

Cal :)


Saturday, 27 May 2017

My daughter Charlotte who is 10 challenged me to making a card using craft supplies that she chose for me, so I challenged her back.... We both used Dreamees stamps, unfortunately the stamp packaging doesn't have a name on them so I can't publish their names :(   We were both given a 6x6 card and envelope from my stash,  we could chose any inks and any Spectrum Noir alcohol ink pens and any embellishments that we wished...

Here are the cards:- The first challenge card is Charlotte's....


I adore what she has done with the flowers, plus popping in the butterflies and drawing the little lines as though they are flying around the flowers... Just love her card its gorgeous!! To embellish her flowers Charlotte used Nuvo Crystal drops -Violet Galaxy 678N. Charlotte had some leaves left over and didn't want to throw them away so she used them inside of  her card to decorate it.  I am so proud of Charlotte :)

This is my challenge card :-


Here is my challenge card,  I also used Dreemees stamps.  I stamped them and cut them all out by hand using some new scissors from Stampin Up, boy are they sharp!! Didn't take me long,  I coloured the flowers in using my Spectrum Noir's and then I used my tweezers to put some definition into the petals.  I glued several layers together making sure I overlapped the petals....  I used the Nuvo Crystal drops - Violet  Galaxy 678N and also the Pale gold 676N, I used a needle and swirled the pale gold into the Violet Galaxy. I was really pleased how it turned out.

Now I have a confession to make I accidentally dropped the needle that had been in the crystal drops and it fell onto my card front... Looking back I think it was a happy accident... Because the accident was big and long I couldn't really cover it up as I didn't have any other card left over from the challenge so....  I sat and thought about it and decided to chop of half of the front of the card and use it as a feature... I then cut two thin strips off the piece of card I had removed from my 6 x 6 card.  I coloured the strips in with the same Spectrum Noir Pens  I had used in the flowers, for it to co-ordinate. I stuck down the strips using my Tonic Nuvo - deluxe adhesive - 200N.  

I then added some Tonic Nuvo - Morning Dew to the flowers and leaves to make it look like there was  water droplets on them etc..

I put 3 drops of Nuvo Crystal drops - Galaxy Violet 678N down the shortened flap on the front of the card on the top and bottom as shown on the first photo.

Looking at the envelope it looked awfully plain so I stamped a flower on the flap and coloured it in with the same Spectrum Noir's to co-ordinate with my flowers on my card.

Thank you for catching up with me

Crafty hugs

Cal :)

Hi sorry I have been away for a while,  I haven't been able to do an awful lot in the last year or so but I feel I am now getting to a place where I can share my crafting with you...  I've still been crafting to help with my pain management but I've not been blogging... I think I lost my confidence a lot so I have given myself a good talking to and off I go with updating you all in what I do with myself on a day to day basis....

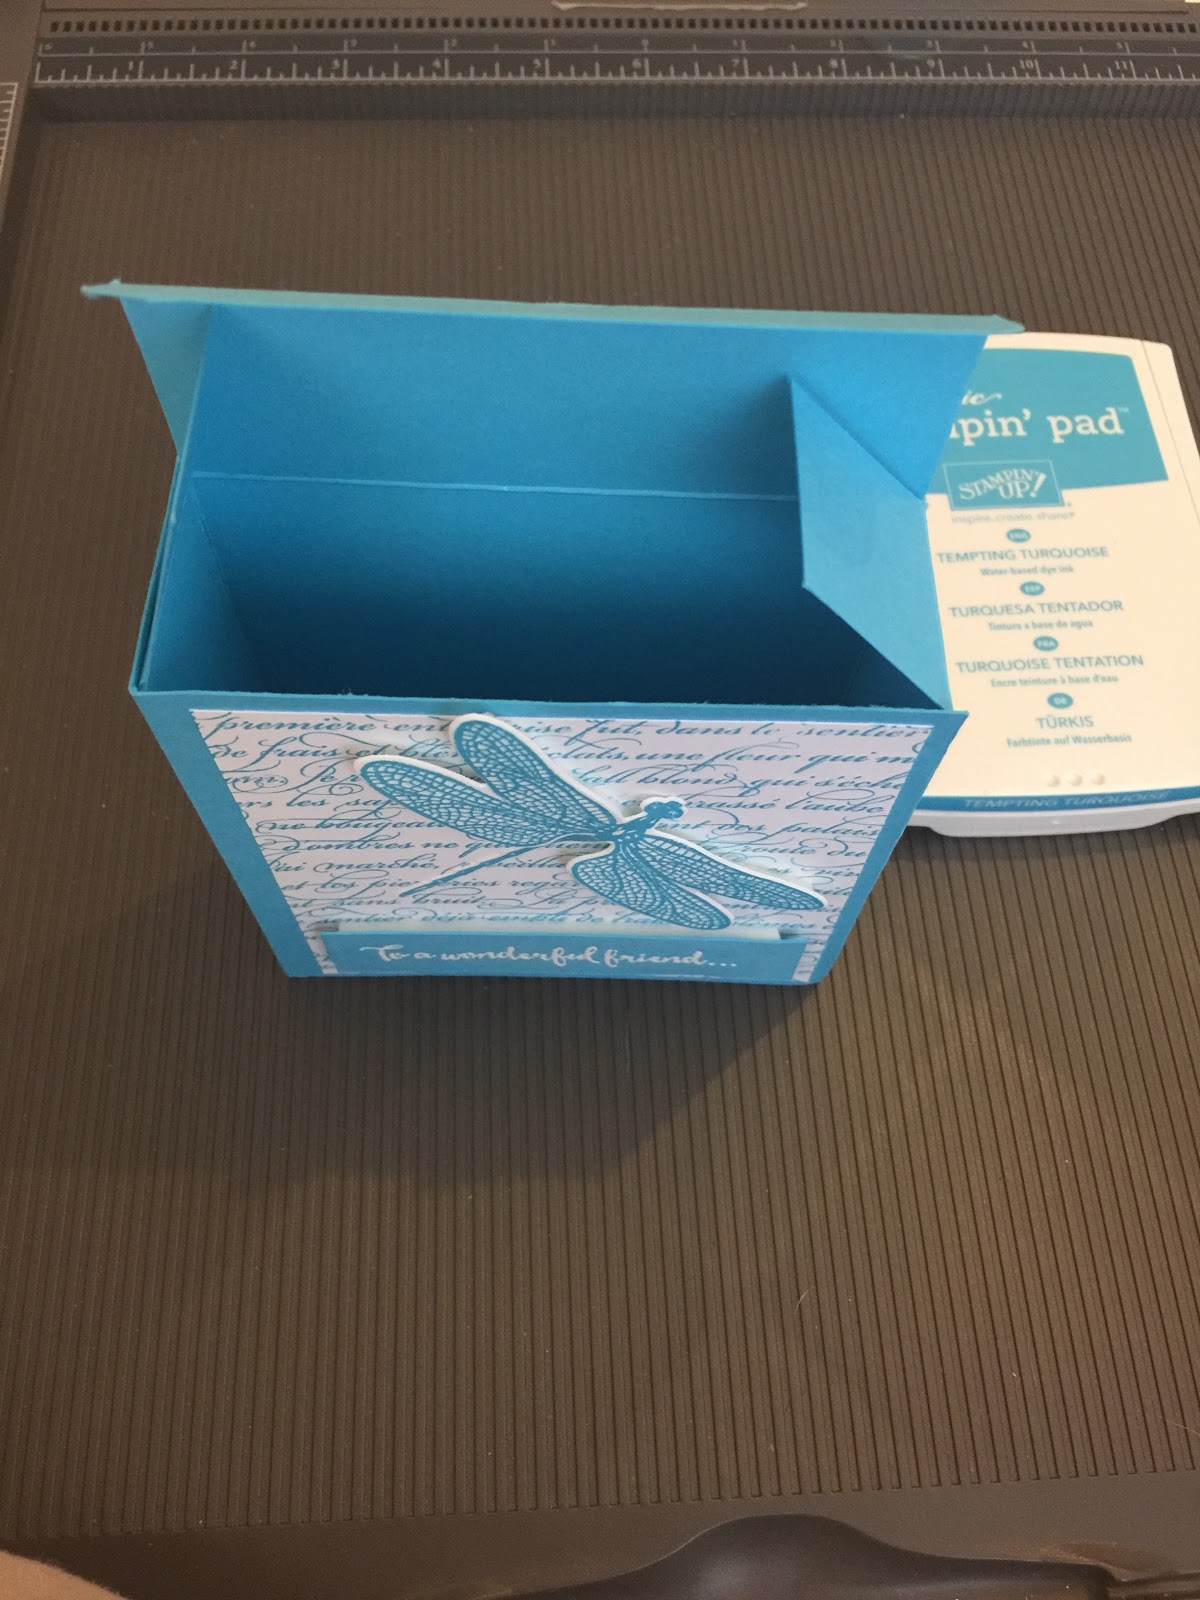
So last weekend my daughter was going to a friends 11th birthday party.  I never know what to get her friends so I decided to give the little girl some money so they can go and spoil herself... I just didn't want to put the money into the birthday card (my daughter made the card), so I decided to make a box gift card, I got the idea from a wonderful lady,  Linda Parker on YouTube.... I made the box out of Stampin up card Tempting Turquoise and here is what I made:-


I used the  retired 'En francais' stamp from Stampin up to stamp onto the whisper white card in the Tempting Turquiose ink and decorated the box.  I recently purchased the 'Detailed Dragonfly Dreams' and 'Detailed Dragonfly Thinlits Dies' from Linda Parker who is a Stampin Up Demonstrator in the UK.  I stamped the Dragon fly twice, on my Tonic Tim Holtz Platform, again in the same ink and die cut them both out.   I glued one of the dragonfly body to the top of the box leaving the wings free.... The sentiment came from the 'Dragonfly Dreams' stamp set, its a lovely sentiment. I stamped it with VersaMark ink and used my Nuvo Embossing Powder - Glacier White Embossing Powder 602N.  I popped the sentiment up with foam tape.


I used the second Dragonfly for the card section on the back of the box gift card and used another sentiment from the same stamp set. The box opens from the top...


Like so.... I thought if I put the envelope inside it would look odd so I brought out my tissue paper and Tonic stamping platform and stamped the dragonfly all over it like so....


I added the tissue paper into the box and I thought it looked very beautiful... Next was to make the envelope to put the money into,  I used Tonic Sweet Nothings -  Treasured Token Die Set 1317e. I cut the envelope out in the same Stampin Up - Whisper White card.   It looked a little bit plain so I used some of the verso dies that comes in the Treasured Token die set on the front of the envelope, I added a piece of the Tempting Turquoise card inside of the envelope to bring out the beautiful decorative piece as shown here....


I die cut a sentiment -  'a gift'  from the same Tonic die set and glued it to the front of the envelope...
I do hope you enjoyed my first attempt of coming back to blogging :) :)

My daughter when she saw the box didn't want to give it away, she wanted to keep it herself...  Lol. After the party my daughter came home and thanked me for making her the box gift card.  She said when she gave it to her friend she said she was amazed with it, she liked the box more than the money!!! It's the little things in life that matter...

Thank you for reading

Crafty Hugs

Cal :)  

Friday, 21 November 2014

Christmas Card

Hello,  thank you for stopping by here today to read my blog post, I haven't been able to get to my craft table in a while so I have been crafting from my hospital bed. It keeps me busy but I have been very slow but the positive news is, I have finished a little Christmas card, and I must say I am very happy with it!!  I posted it onto Facebook onto one of the closed groups and I could not believe my eyes when I looked the following morning and I'd had 350+ Likes... OMGosh!! I was blown away by all of the lovely comments that people had left, crafters are such a friendly bunch!!! :)
Here is my little Christmas Card


Thank you again for looking, please leave a comment.
Happy Crafting
Cally :)


Friday, 10 October 2014

End of term teacher card.

My daughter who is 8 years old asked me this morning if we could make her teacher a 'Thank you card' for this term... She asked me 10 minutes before leaving the house :-/  I looked at her and said but sweetheart this is your last day today, you break up for the October holidays at 3:15 today!!!

She grinned at me and asked if she could be a homer for lunch today because she could pick up the card and take it back to school in the afternoon!! :-/   Nothing like putting me on the spot Hey!!

I did carefully warn her that I would see what I could do but I wasn't promising, she said 'You can do it Momma, I know you can'  Lol :D

Unfortunately I am bed bound today so all my crafty stash is outwith my reach, I asked my Carer's to help retreive items for me before they left. This is the card I came up with, it's a very clean and simple card.

Hope you like it, my daughter loved it which was brilliant, so I am a happy Momma :)

Hope you like the thank you card.

Thank you for looking Cally xx


Saturday, 4 October 2014

Bebunni Birthday card for a special friend.

I adore this little bunny he is just so cute so when Crafters Companion released the first CDROM it slipped into my shopping basket :)  I normally don't do CDROM crafting but this little fella changed my mind. I really enjoyed printing him out then fussy cutting, I found it very relaxing....

I brought out the good old Pinflair and did a little bit of decoupage with this little bunny, I was delighted with the outcome.  I had to do some stamping (I love stamping!!) I knew the Clearly Besotted stamp with the sprig of leaves would be perfect above his gorgeous floppy ears.

I used a Tonic punch to make my little handmade flowers, I had a pink envelope from one of our birthdays that had past this year that matched the envelope in BeBunni's hand, so I set about making some little flowers. I do like making my own flowers :) Then I added a spellbinders tag to the flowers to incorporate a sentiment.

 Thank you for stopping by today to visit, I hope you like the card

Happy crafting Cally x


Friday, 19 September 2014

My first Wedding Card

Hi I was asked to make a Wedding Card...... Eeeeeeek!!! But I was up for the challenge :)  and I must admit I am very happy with it, but I do feel there is something missing!! Please let me know honestly what you think.

Thank you in advance Cally :)


I would like to enter my card into the Polkadoodles Week 38 Sketch Challenge.


Saturday, 30 August 2014

Finished Aurora Wings digi with Spectrum Noir's


Well the school holidays have come to an end here in Scotland, it's a shame :(
I always love the school holidays, having my 2 girlies and their friends in and out of our home, you hear lots of laughter the occasional cry with a skint knee, we have been very lucky this summer with the weather here in Bonny Scotland and because we stayed at home this summer we have had good quality time together. Hence why no posts from me while they have been off.

Well, all good things come to an end, back to alarm clocks!! Lol, the hustle and bustle of getting my little one off to primary school, my older daughter goes to high school so she gets herself organised and leaves early, hubby will be next off to work, it's when they all say bye, see you later, the door closes and the house sounds so quiet :(

But that means I have to keep myself busy.....

So I pulled out my half coloured Aurora Wings digi and a few hours later she was finished. I must admit I am very proud of her, it's the first big project that I have done with my Spectrum Noir's.


I have to work out what I am going to do next..... 

I have been asked to make some children's wedding labels to hang on their favour bags, so after finishing them today I will take photos and give you a peek. How exciting (although a little daunting).

I also have been asked to make a birthday card featuring ducks and skulls, now this one I am struggling a little to be honest, but I will get the children's wedding labels out of the way first I then I will put my thinking cap on! 

Thank you for stopping by today
Happy Crafting

Cally :)

Tuesday, 29 July 2014

Practising with Spectrum Noir Alcohol Pens

Hello

I have been very very busy trying to improve my technique with my Spectrum Noir's Alcohol pens and I do mean trying Lol. I have been on Facebook and fallen in love with 'Aurora Wings' Fantasy art by Mitzi Sato-Wiuff, so I popped over to her Etsy site.....  OMG!! Oh Wow.... talk about colouring heaven!! I held back and only purchased two of her digi stamps, they are beautiful. After tearing myself away from Mitzi's Etsy's site I looked for her blog which is set out so beautifully.  Here is the link aurorawingsshowcase.blogspot.co.uk
(Puts mine to shame) but I have to remember I'm still a newbie!!

I joined a page on Facebook called 'Kit and Clowder'  Wow is all I can say Alyce who runs the page is a fantastic colourist she also has a blog www.kitandclowder.ning.com where she helps you with your Alcohol Marker colouring etc... through taking her courses that are advertised on her blog. When I clicked onto her Facebook page, there to my amazement was a freebie download from Aurora Wings, after catching my breath hehe... WELL I just had to have it!!! It's a beautiful drawing of a lady and two owls.  I love Owls and I love Mitzi's gorgeous drawings so I downloaded it straight away and this is what all my free time has been spent on.

I have been reading up on why I should be watermarking my photo's that I upload onto my blog and also onto Facebook. Does anybody know of a good watermark app they use that is suitable with an IPad.  I would be very interested in hearing what you use please :)  I have downloaded one particular App from my IPad and I have worked out how to work it but I wanted the fonts/Graphics to look different.

I added a watermark onto the picture I am currently colouring then I was able to upload what I have coloured so far.  It's a mystical figure so I thought it could warrant a different coloured skin, I have gone completely out of my comfort zone on this one. Hope you like her (so far)


So back to the drawing board 'so to speak' 

As you can see it's not finished yet, I have to decide what colour I'm going to do the owls and the feathers in her hair.... Erm???   No idea's at all as yet :/  
She will sit propped up on my table and I will figure it out unless you guys have any idea's.
Please feel free to leave any comments where I could improve my technique, what colours would go with the ones I have already chosen:-

Face LV1,2,3
Hair CG2, DG3, JG6
Flowers PL2,5, OR1

Thank you for stopping by

Cally :)


Saturday, 19 July 2014

Colouring Prima dolls with Spectrum Noir Alcohol Pens.

I had great fun colouring this doll image by Julie Nutting with my Spectrum Noir alcohol pens. I am a newbie to alcohol pens, (I know I have a long way to go to perfect my technique). Some of the images on YouTube, Facebook and on different blogs/challenges that I have seen, I am completely in awe of because their colouring techniques are outstanding!  When I am colouring I get so engrossed in what I am doing that time flies by. If anybody does read my blog post today, please feel free to critique my doll image and if you have any tips for me for colouring, I would love to hear them.

Cally :)


I stamped the doll image using Memento Tuxedo Black ink on Neenah Classic Crest card 216gsm Ultra Smooth Solar White from Crafter's Companion. 
Spectrum Noir:-  Hair - GB1, GB3.  Skin - FS1,FS2,FS3.   Jacket/Skirt - DR1,DR5, DR7.   
Hair band/Top of dress/Shoes - GB8, GB10.

Thursday, 17 July 2014

First ever post in blog land...

Oh gosh this is a very odd feeling for me, I don't know wether it's a feeling of fright or a feeling of excitement.  My blog is hopefully going to be a new chapter in my life.  To enable me to share with you little projects that I've made and completed!! Lol   I may not be able to post everyday depending on life!! but now I am here I am going to enjoy the journey ;)

Speak to you soon, Cally